Introduction
In this guide, the reader will learn how to integrate a vibration plate with resistance bands to create efficient, low‑impact workouts that build strength, tone muscle, and accelerate recovery. The combination leverages high‑frequency vibrations to recruit additional muscle fibers while the bands add external load, producing a synergistic effect that surpasses traditional static exercises. By following the step‑by‑step instructions, one can safely progress from beginner to advanced routines, achieving measurable gains in less time. The guide also highlights product options that simplify set‑up and enhance performance.
What You’ll Need
- A vibration plate with adjustable speed settings and a stable, non‑slip surface.
- Resistance bands of varying tension (light, medium, heavy) that can be anchored to the plate.
- A comfortable, non‑slippery floor space where the plate can be stored when not in use.
- A timer or smartphone app to track interval durations.
All of these items are often bundled with the vibration plates described later, reducing the need for separate purchases.
Step 1: Choose and Set Up Your Vibration Plate
Begin by selecting a vibration plate that matches your space, budget, and performance requirements. The Lifepro Waver offers 99 speed settings, a 10‑preset program library, and a maximum user weight of 330 lb, making it suitable for most home gyms. Its anti‑slip rubber surface and whisper‑quiet motor ensure stability and comfort during prolonged sessions. Priced at $199.99 with a 4.6‑star rating from over 30,000 reviews, it provides a premium experience without excessive cost.
If space is limited or a lower price point is desired, the SoftGym Vibration Plate delivers 120 speed levels, a 450 lb capacity, and built‑in magnetic massage stones for added lymphatic stimulation, all for $59.99 and a 4.4‑star rating from 4,800 reviews. Its compact footprint and ultra‑quiet motor make it ideal for apartments.
To set up the plate, place it on a flat, level surface, preferably on a carpet or rubber mat to further reduce vibration transmission. Ensure the anti‑slip suction cups (if present) are firmly engaged. Connect the power cord, turn on the unit, and verify that the display lights up correctly. Adjust the speed to a low setting (e.g., level 3) and stand with knees slightly bent to test stability before proceeding.
Step 2: Select Appropriate Resistance Bands
Resistance bands add external load, increasing muscle activation beyond what vibration alone can achieve. The Lifepro Waver package includes two loop bands and four resistance bands of varying tension, allowing you to progress gradually. For users of the SoftGym model, two exercise bands are supplied; they may be lighter, so consider purchasing additional bands if you require higher resistance.
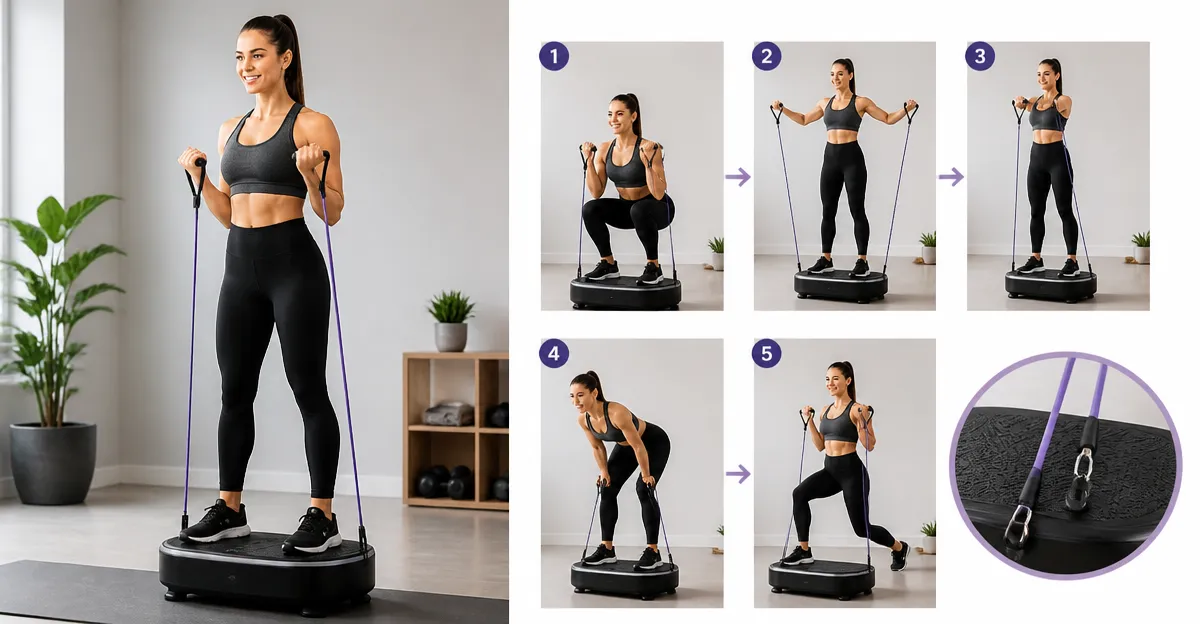
When choosing bands, look for durable latex construction, wide handles for grip comfort, and clear tension markings. Light bands (10–20 lb) are ideal for upper‑body activation, while medium (20–35 lb) and heavy (35–50 lb) bands support lower‑body and core work. Attach the band to the plate’s built‑in hooks or to a stable anchor point on the frame, ensuring the connection is secure before each set.
Step 3: Warm‑Up on the Plate
Warm‑up prepares the nervous system and increases blood flow, reducing injury risk. Start with a low vibration speed (level 2–4) and stand with feet shoulder‑width apart. Perform gentle ankle circles, hip swings, and shoulder rolls for 2–3 minutes while the plate vibrates. This dynamic warm‑up activates proprioceptive receptors, enhancing the effectiveness of subsequent resistance‑band exercises.
For added variety, hold a light resistance band in each hand and perform arm extensions during the warm‑up. The combination of vibration‑induced muscle twitches and band tension creates a mild cardiovascular stimulus comparable to a brisk walk.
Step 4: Core Activation with Bands
Engaging the core early in the session improves stability for later lower‑body movements. Set the plate to a moderate speed (level 6–8) and place a medium‑tension band around your forearms. Assume a plank position with your forearms on the plate, keeping your body in a straight line. Hold for 30 seconds, then rest for 15 seconds. Repeat for three rounds.
The vibration induces involuntary muscle contractions, while the band forces the shoulders and arms to maintain tension, resulting in a dual‑stimulus that deepens core recruitment. Users of the EvoSpark Dual Motor Vibration Plate will appreciate its 150 W dual‑motor system, which delivers smoother, higher‑frequency vibrations that enhance this effect. Priced at $49.98 with a 4.5‑star rating from 1,100 reviews, it offers excellent value for those focused on core work.
Step 5: Lower‑Body Strength Circuit
Transition to a lower‑body circuit that combines squat variations with resistance bands. Set the plate to a higher speed (level 10–12) for increased muscle activation. Loop a heavy‑tension band around both thighs, just above the knees, and perform the following sequence:
- Squat down to a 90‑degree knee angle, hold for 2 seconds, then rise. Perform 12 repetitions.
- Step‑out lunges: Place one foot forward on the plate, the other behind on the floor, and lower into a lunge while keeping the band taut. Complete 10 reps per side.
- Calf raises: Stand with both feet on the plate, rise onto the balls of your feet, and lower slowly. Perform 15 repetitions.
The band’s lateral resistance prevents knee valgus, ensuring proper alignment, while the plate’s oscillation adds an extra stimulus that mimics high‑intensity interval training. For users of the MERACH Curved Vibration Plate, the curved silicone surface offers a comfortable arch support that reduces foot fatigue during these movements. It is priced at $79.99 with a 4.4‑star rating from 2,300 reviews.
Step 6: Upper‑Body Toning with Bands
After the lower‑body circuit, lower the plate speed to a gentle level (level 3–5) and focus on upper‑body exercises. Attach a light‑to‑medium band to the plate’s side hook, then perform the following:
- Standing Row: Face the plate, hold the band with both hands, pull toward your torso while keeping elbows close to your sides. Complete 12–15 repetitions.
- Chest Press: Turn away from the plate, hold the band behind you, and push forward as if performing a bench press. Perform 12 repetitions.
- Shoulder Press: With the band under your feet, press upward until arms are fully extended. Complete 10 repetitions.
The vibration enhances motor unit recruitment, allowing lighter bands to produce comparable strength gains to heavier traditional weights. This approach is especially beneficial for individuals with joint limitations, as the low‑impact nature reduces stress on the shoulders and elbows.
Step 7: Cool‑Down and Recovery
Conclude the session with a 5‑minute cool‑down on the plate at the lowest speed (level 1). Perform gentle stretching motions such as hamstring pulls, quadriceps holds, and upper‑back stretches while the plate vibrates. The gentle oscillation promotes lymphatic drainage, aiding in the removal of metabolic waste produced during the workout.
For an added recovery boost, consider using the magnetic foot massage feature of the SoftGym Vibration Plate, which combines vibration with magnetic reflexology to accelerate circulation. This dual‑action can reduce post‑exercise soreness and improve overall mobility.
Tips & Pro Tips
- Start Low, Progress Gradually: Begin each new exercise at the lowest speed and lightest band tension. Increase intensity only when you can maintain proper form for the full set.
- Maintain Slight Knee Bend: Keeping knees slightly bent during all plate exercises reduces joint impact and enhances muscle activation.
- Use a Timer: Set intervals of 30‑seconds work followed by 15‑seconds rest to mimic high‑intensity interval training (HIIT) principles.
- Stay Hydrated: Vibration can increase sweat production; drink water before, during, and after the session.
- Foot Positioning: For maximum vibration transfer, place the entire foot flat on the plate rather than just the heels or toes.
- Combine with Cardio: Pair plate sessions with low‑impact cardio (e.g., brisk walking) on alternate days for balanced conditioning.
Troubleshooting
| Problem | Possible Cause | Solution |
|---|---|---|
| Plate vibrates unevenly | Uneven floor surface or loose suction cups | Place a rubber mat underneath and ensure suction cups are fully engaged. |
| Band slips off anchor | Improper attachment or worn hook | Re‑attach using the designated hook; replace band if frayed. |
| Excessive noise | Plate placed on a hard surface | Move the plate onto a carpet or use a vibration‑absorbing mat. |
| Dizziness or nausea | Speed set too high for current fitness level | Reduce speed to a comfortable level and focus on steady breathing. |
Conclusion
By following the outlined steps, the reader can confidently integrate a vibration plate with resistance bands to achieve stronger muscles, improved tone, and faster recovery. The guide demonstrates how to select appropriate equipment, execute a balanced full‑body routine, and troubleshoot common issues. Consistent use of these tools, combined with proper progression, will yield measurable results while minimizing joint stress. Embrace the technology, stay consistent, and watch your fitness level rise.
Products Mentioned in This Guide
Frequently Asked Questions
How do I safely set up a vibration plate with resistance bands?
Place the plate on a stable, non‑slip surface, attach the bands to the plate’s anchor points, and adjust the vibration speed before stepping on.
What resistance band tension should I start with?
Begin with light‑to‑medium bands to master form, then progress to heavier bands as strength improves.
How long should each vibration‑band interval be?
Start with 30‑second intervals and a 30‑second rest, gradually increasing to 45‑60 seconds as endurance builds.
Can vibration plate workouts aid recovery?
Yes, the low‑impact vibrations increase blood flow and reduce muscle soreness, making them ideal for active recovery days.
Do I need a special timer for these workouts?
A simple smartphone timer or interval app is sufficient to track work‑rest periods.