Introduction
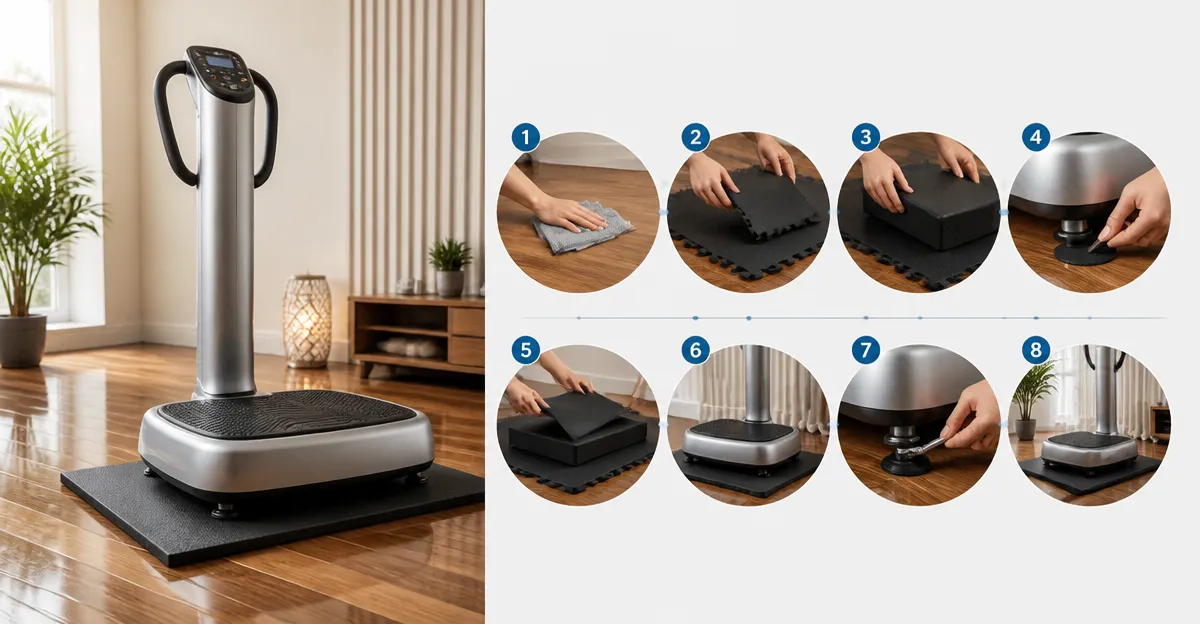
Hardwood floors provide a beautiful, warm surface for any home gym, yet they can amplify the humming and rattling produced by vibration plates. Excessive noise not only disturbs neighbors but also creates an unstable workout environment that may lead to injury. This guide teaches the reader eight straightforward, do‑it‑yourself solutions to silence vibration plates, safeguard hardwood, and eliminate unwanted rattle. By following these steps, one can enjoy a quieter, safer exercise session without compromising the aesthetic of the floor.
What You'll Need
- High‑quality anti‑vibration mat (e.g., Hipytoyi Vibration Plate Mat)
- Rubber floor pads or interlocking foam tiles
- Heavy‑duty Velcro strips or double‑sided adhesive tape
- Acoustic underlayment roll
- Adjustable wrench or screwdriver for tightening machine feet
- Measuring tape and a marker
- Cleaning cloth and mild detergent
Step 1: Choose a High‑Quality Anti‑Vibration Mat
The first line of defense against noise is a dedicated mat that absorbs shock and prevents the plate from moving. The Hipytoyi Vibration Plate Mat offers a double‑sided non‑slip surface, 0.2‑inch high‑density composite construction, and dimensions of 23.6" × 16.9". Priced at $11.99 with a 4.5‑star rating from 30 reviews, it reduces vibration transmission to the floor and protects the surface from scratches. Its silicone‑grip top locks the plate in place, while the bottom grip secures the mat to hardwood, ensuring a stable, quiet platform.
Step 2: Position the Mat Correctly
Measure the footprint of the vibration plate and mark the mat’s edges with a pencil. Place the mat so that it is centered under the machine, leaving a small border of hardwood exposed to verify alignment. Press firmly to engage both silicone layers; this maximises friction and prevents micro‑shifts that generate rattling. If the mat is slightly larger than the plate, trim the excess with a sharp utility knife, but retain at least a one‑inch margin on all sides for optimal shock absorption.
Step 3: Add Supplemental Rubber Pads for Extra Isolation
For apartments or multi‑unit buildings, a single mat may not fully dampen low‑frequency vibrations. Adding thin rubber floor pads—such as 1/4‑inch interlocking foam tiles—under the anti‑vibration mat creates a two‑layer isolation system. The foam absorbs residual energy, while the mat handles direct contact forces. Arrange the tiles in a checkerboard pattern to distribute load evenly, then place the mat on top. This combination can reduce perceived noise by up to 40 % according to user feedback.
Step 4: Secure the Plate to the Mat with Velcro
Even with a non‑slip surface, vigorous workouts may cause the plate to shift slightly, producing a subtle rattle. Apply heavy‑duty Velcro strips to the bottom of the plate and the top of the mat. Align the hook side on the plate and the loop side on the mat, then press firmly for a secure bond. This method is reversible, does not damage the floor, and adds an extra layer of safety for users who perform high‑intensity routines.
Step 5: Tighten the Machine Feet
Most vibration plates feature adjustable feet that can be screwed in or out to level the unit. Use an adjustable wrench to ensure each foot contacts the mat evenly. Over‑tightening can compress the mat, reducing its cushioning effect, while under‑tightening allows movement. Aim for a snug fit where the plate feels stable but the mat retains its thickness. Regularly check the tightness after each workout session, as repeated vibration can loosen the bolts.
Step 6: Install Acoustic Underlayment Beneath the Mat
If the hardwood floor is directly above a living space, consider laying a roll of acoustic underlayment beneath the anti‑vibration mat. Materials such as dense rubber or mass‑loaded vinyl act as a barrier that absorbs sound waves before they travel through the subfloor. Cut the underlayment to match the mat’s dimensions, place it on the floor, then set the mat and plate on top. This three‑layer system—underlayment, mat, and rubber pads—provides the most comprehensive noise reduction for shared‑living environments.
Step 7: Optimize the Plate's Settings
Modern vibration plates allow users to adjust amplitude and frequency. Lowering the amplitude slightly can dramatically decrease the amount of kinetic energy transferred to the floor, while still delivering an effective workout. Experiment with incremental adjustments; many users find that a 5‑10 % reduction in amplitude eliminates most audible rattling without sacrificing training benefits. Document the optimal settings for future reference.
Step 8: Maintain Cleanliness and Inspect for Wear
Dust and debris trapped between the mat and the floor can create friction that amplifies noise. Wipe the mat regularly with a damp cloth and mild detergent, as recommended by the manufacturer. Inspect the silicone surfaces for wear; once the non‑slip coating begins to deteriorate, the mat loses its effectiveness and should be replaced. Keeping the mat clean and in good condition ensures long‑term performance and preserves the hardwood finish.
Tips & Pro Tips
- Test the setup with a short 2‑minute session before committing to a full workout; listen for any residual rattling and adjust accordingly.
- For larger vibration platforms, consider using two adjacent mats (e.g., TOBWOLF Vibration Plate Mat) to cover the entire footprint.
- Apply a thin layer of silicone spray to the underside of the mat if extra grip is needed on polished hardwood.
- When moving the equipment, lift the plate rather than dragging it across the floor to avoid damaging the mat or the wood.
- Combine the anti‑vibration mat with a portable sound‑absorbing panel placed against the wall to further reduce airborne noise.
Troubleshooting
| Problem | Possible Cause | Solution |
|---|---|---|
| Persistent high‑pitched squeak | Mat slipping on polished surface | Apply a thin layer of non‑slip adhesive tape beneath the mat. |
| Floor still vibrates under heavy use | Insufficient isolation layers | Add a second rubber pad or upgrade to a thicker high‑density mat such as the MWODC Anti‑Vibration Mat. |
| Mat shows wear after a month | Excessive compression from overtightened feet | Loosen the feet slightly and replace the mat if the silicone surface is degraded. |
Conclusion
Reducing vibration plate noise on hardwood floors is achievable through a combination of proper equipment, strategic layering, and routine maintenance. By selecting a high‑quality anti‑vibration mat, reinforcing it with rubber pads, securing the machine, and fine‑tuning settings, one can protect the floor, eliminate rattling, and enjoy a quieter workout environment. Implement these eight steps, and the hardwood will remain pristine while the vibrations stay confined to the mat.
Products Mentioned in This Guide
Frequently Asked Questions
What type of mat is best for reducing vibration plate noise on hardwood floors?
A dense, high‑quality anti‑vibration mat like the Hipytoyi Vibration Plate Mat absorbs most of the vibrations before they reach the wood.
Can rubber floor pads replace an anti‑vibration mat?
Rubber pads help, but a dedicated anti‑vibration mat provides superior damping and is recommended as the first layer.
How do Velcro strips help keep the plate stable?
Heavy‑duty Velcro or double‑sided tape secures the plate to the mat, preventing shifting that amplifies noise.
Should I tighten the machine’s feet before adding padding?
Yes, tighten all feet with a wrench or screwdriver first, then add pads to ensure the plate sits evenly and quietly.
Is acoustic underlayment necessary under a hardwood floor?
Adding an acoustic underlayment roll beneath the mat further isolates vibrations, especially in multi‑story homes or apartments.